
Integrating Cloudflare with Ceylon Servers for enhanced security
As your website grows, it becomes a target for automated spam bots, malicious login attempts, and severe security threats like DDoS (Distributed Denial of Service) attacks. To protect your infrastructure and double your website's loading speed globally, integrating your server with Cloudflare is the industry standard.
Cloudflare acts as a secure reverse-proxy shield between your visitors and Ceylon Servers. It filters out malicious traffic before it ever touches our server nodes, while caching your static files to load your site instantly.
Follow this complete, step-by-step guide to set up a Cloudflare account and link it to your website:
Phase 1: Create a Free Cloudflare Account
If you do not have a Cloudflare profile yet, you must register a free account to manage your domain security rules.
- Go to the official website: https://www.cloudflare.com/
- Click the "Sign Up" button in the top right corner.
- Enter your professional email address, create a highly secure password, and click "Sign Up".
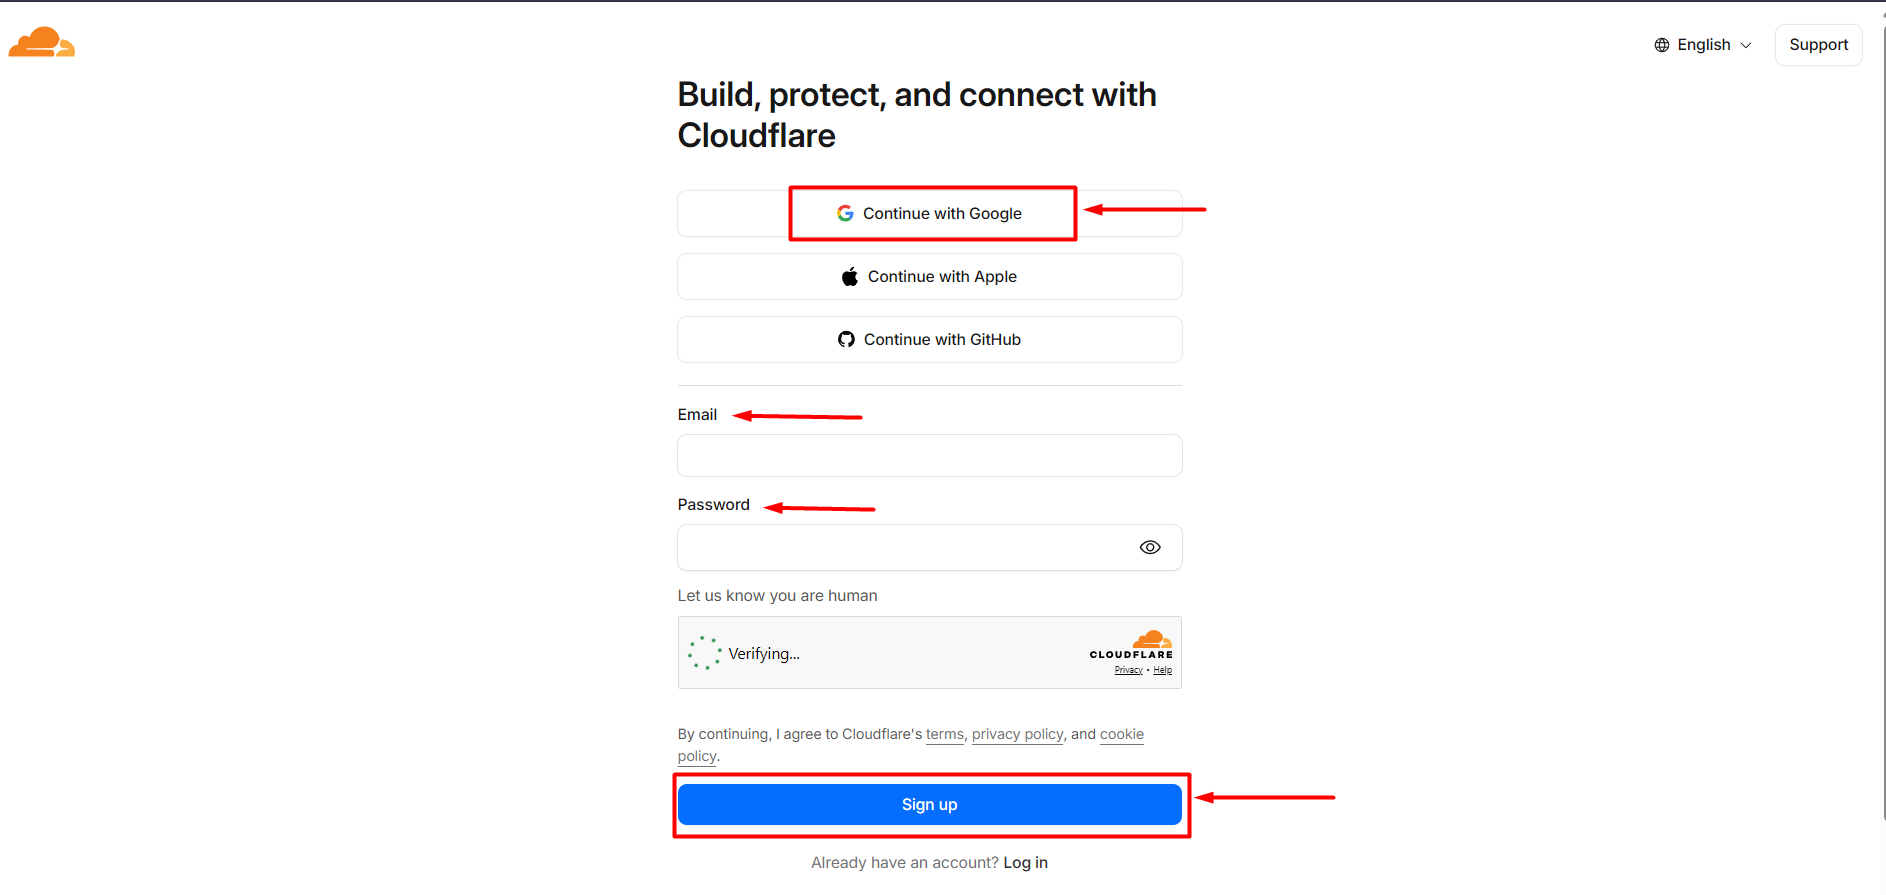
- Check your email inbox for a verification link sent by Cloudflare and click it to fully activate your profile workspace.
Phase 2: Add Your Domain Namr to Cloudflare
- Log in to your newly created Cloudflare dashboard panel.
- Click the blue "Add" button.
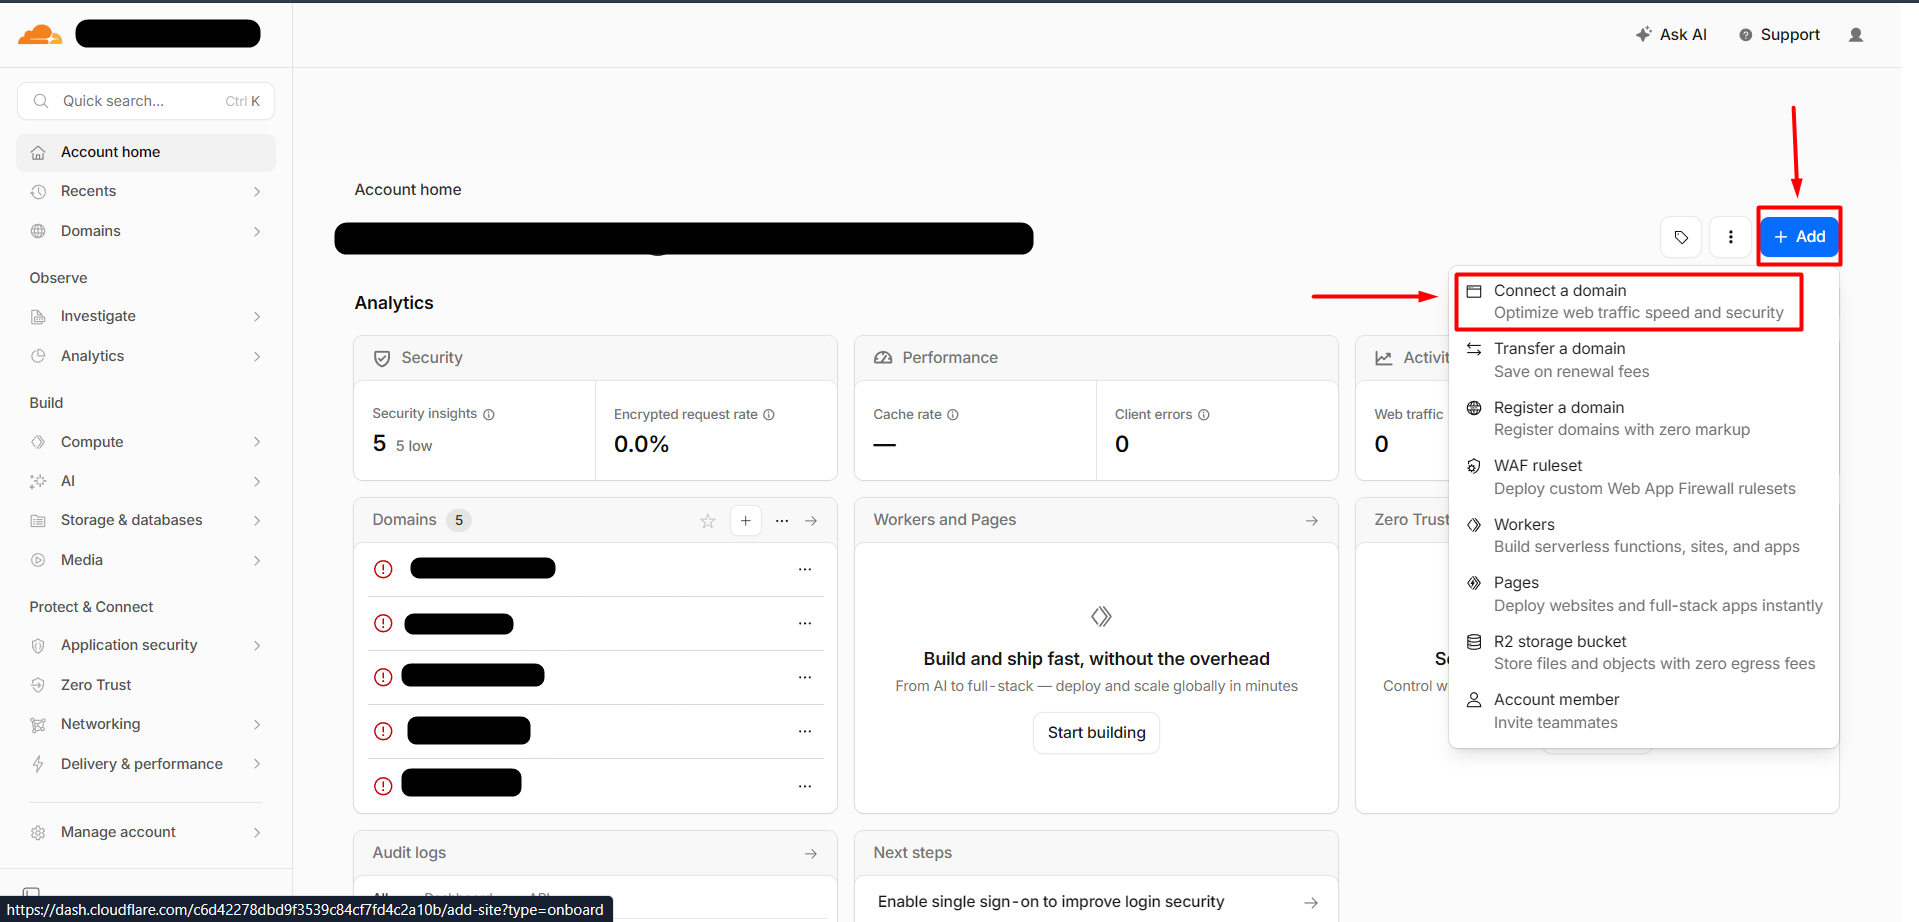
- Type your exact domain name (e.g.:
yourdomain.com— do not include http or www prefixes) and click "Continue". - Cloudflare will display their premium tier matrices. Scroll down to the bottom of the page and select the "Free" plan plan layout ($0/month). Click "Continue".
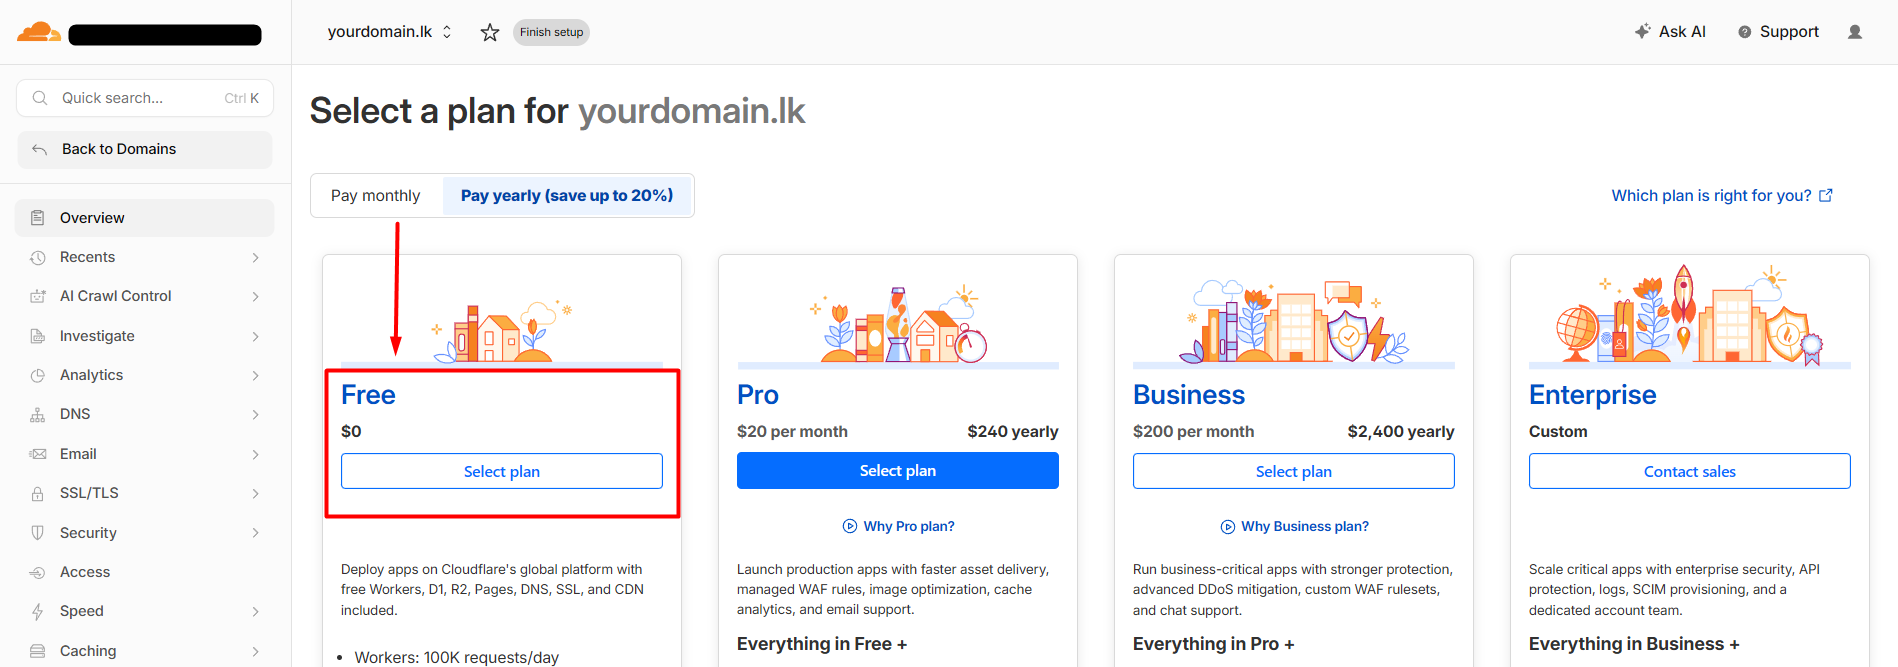
Phase 3: Automatic DNS Record Scanning
- Once you select the free plan, Cloudflare's automated system bots will scan your existing domain registry paths to copy all active server settings.
- You will see a comprehensive listing chart containing all your server entries (A records, CNAME, MX records, etc.).
- Verify the Layout: Ensure your primary domain A record points directly to your CeylonServers host IP address.
- Add Missing Records (Optional): If you notice that any of your important DNS records were not copied automatically during the scan, you can manually add them right here before moving forward. Simply click the "Add record" button at the top of the table, select the record Type (A, CNAME, TXT, MX), enter the Host name and Value, and click "Save".
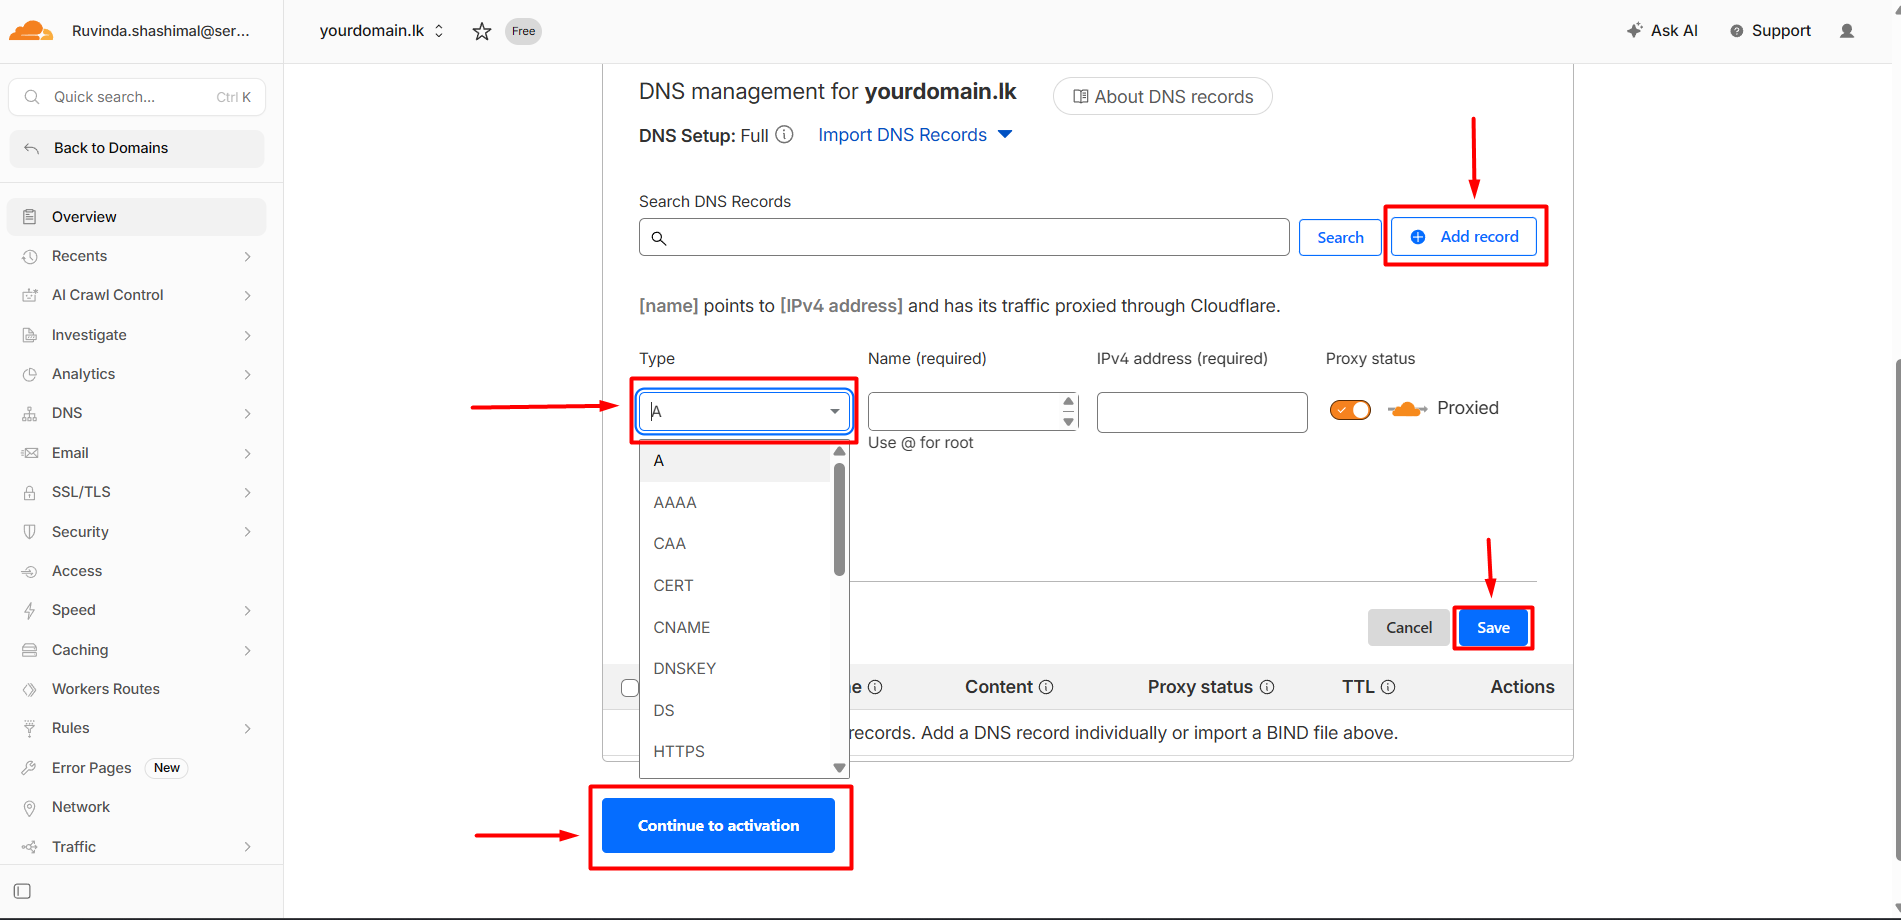
- Ensure the "Proxy status" toggle column is highlighted with an Orange Cloud (Proxied) for your main domain lines. (This indicates your real server IP is now hidden behind Cloudflare's firewall).
- Click "Continue".
Phase 4: Update Your Domain Nameservers (Crucial)
- To route your global web traffic through Cloudflare's security nodes, you must replace your old server paths with Cloudflare's assigned nameservers.
- Cloudflare will now display your configuration variables:
- Cloudflare's Assigned Nameservers: (e.g.:
olga.ns.cloudflare.com&walter.ns.cloudflare.com) - Open a separate browser tab and log in to the Domain Registrar where you bought your domain name (e.g.: CeylonServers, Namecheap, GoDaddy, or LK Domain Registry).
- Find your domain’s DNS Management / Nameservers properties section.
- Switch the configuration setting from "Default/Custom Hosting Nameservers" and paste the two specific Cloudflare nameservers exactly into the slots.
- Save your modifications.
Phase 5: Final Security Optimization (The SSL Loop)
- Go back to your Cloudflare browser tab and click "Done, check nameservers".
- On the Quick Start Guide setup page, ensure Automatic HTTPS Rewrites and Always Use HTTPS toggles are turned ON.
- Crucial SSL Encryption Rule: In the left sidebar of Cloudflare, go to SSL/TLS ➔ Overview. Ensure your encryption mode is set to "Full" or "Full (Strict)".
- Warning: Do not set it to "Flexible", as this will create an infinite redirection loop crash error with our server's built-in Let's Encrypt SSL certificate!
- Success! Your Site is Protected
- SSL Encryption Documentation: Click Here
Nameserver updates can take anywhere from a few minutes up to 2 to 24 hours to propagate across all global telecom routing paths. Once Cloudflare completes the network integration, you will receive an email confirmation saying "Cloudflare is now protecting your site".
Your server IP address is now completely masked, and your digital business is safe from cyber threats!
Should you require any further technical assistance, please do not hesitate to open a support ticket. Our technical team is always ready to assist you